


HDI Compact Quickstart
Connecting HDI Compact to Host Computer
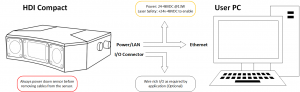
- Ensure that the sensor is on by verifying that the POWER LED is illuminated
- Ensure that the Ethernet RJ45 plug is connected to an Ethernet port.
Configuring Network Settings
-
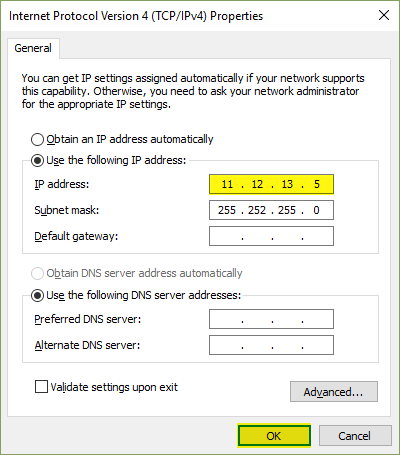
Ensure the host computer’s Subnet matches the Subnet of the scanner. HDI Compact Scanners will have the following default settings:
| Setting | Default |
| DHCP | Disabled |
| IP Address | 11.12.13.1 |
| Subnet Mask | 255.255.255.0 |
| Gateway Path | 0.0.0.0 |
- If you are unsure of the scanner’s IP settings, or if the default IP settings conflict with your host’s other networks, you can use a simple tool called kDiscovery to confirm and/or change the scanner’s IP Address (Download).
- Note: Older scanners will have an IP Address of 192.168.1.10
-
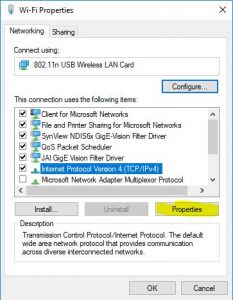
Check Host Network settings by opening Control Panel > Network and Sharing Center > Change Adapter Settings. Right-click desired network and select Properties.
- On the Networking tab, select Internet Protocol Version 4 (TCP/IPv4), and then click Properties.
- Ensure that DHCP is disabled and that the subnet matches the IP of the sensor. The default is 11.12.13.1, but as long as the first three values match it should be fine.
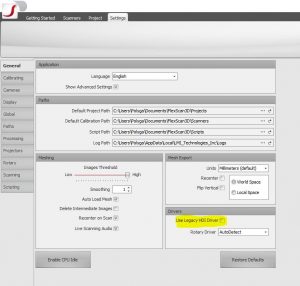
Driver Settings
-
If your are using the older 109 or 120 models, make sure to enable HDI Legacy Drivers under the Settings menu. If you are using the C109, C210 or C506, then Legacy Drivers should be disabled.
- Flexscan3D must be restarted when this setting is changed.
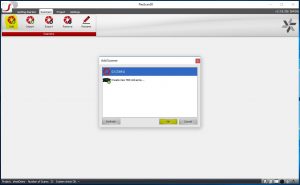
Add Scanner in Flexscan3D
Under the Scanners menu, select Add.You should see a red icon for the C-series scanners. For older models, you will see a blue icon. Select G3 and click Ok.
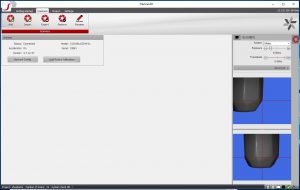
Once properly connected in Flexscan3D, you should be able to able to see a live-preview of the scanner on the right hand side. You are then ready to begin scanning.
Compatable Firmware Version
- If there is mismatch between FlexScan and HDI Compact firmware, it might not work properly. So please make sure you are on firmware 4.7.12.47
You can download the firmware here. Download Firmware: 4.7.12.47
Troubleshooting
Scanner is not connecting
- If your system is using a wireless or home network, ensure that the scanner’s subnet does not match your own network. For example, if your network’s IP is 192.168.1.XX, then it is advised that you change your scanner’s IP to something like 192.168.0.YY.
- If you are unsure of whether your scanner’s network settings are properly configured, a good way to verify is by trying to connect to it via a web browser by entering your scanner’s IP into the browser’s address bar. If you are unable to connect, there is likely an issue with your network settings.
- Ensure that there is no firewall interference with the scanner.
- If you are unsure of the scanner’s IP settings, or if the default IP conflicts with your host’s other networks, you can use a simple tool called kDiscovery to confirm and/or change the scanner’s IP Address (Download).